How I migrate a bare-metal moodle instance to scalable Cloud-based Solution
Learn how I migrate a monolithic big moodle instance to a scalable cloud solution using Google Cloud Platform product and service

Moodle has been the go-to learning management system for many schools since it is a FOSS, very flexible, and easy to manage for even a large university like ours.
Before migrating, our moodle instance was served by an HPE Server with 2x 2nd Gen EPYC Processor and ~60 GB memory serving around 5000 concurrent users. Nothing wrong with the servers, and the moodle performance was really good. The problem is our data centre is straight up not reliable. So we decided to migrate our moodle instance to cloud service.
We are using Google Cloud Platform in this implementation, but the architecture design and the migration step can be applied to any cloud provider you want.
Designing The Architecture
Cloud, especially IaaS, can be very expensive, so we must consider what resources we can use while minimizing cost.
Splitting the server
As we are going for scalability, we cannot put every moodle component into a single, monolithic infrastructure design and then scale it as a whole. For the bare minimum, moodle needs a web server and a database server, but if we want to add a load-balancing solution on top of that, we need another server to share the moodledata directory between the load-balanced web servers, we will use an NFS server.
Now, here comes another problem: by default, moodle use a file-based caching system to cache SQLs, sessions, etc. The file-based caching system will take a hit and become very slow when using a network-based file sharing like NFS. Fortunately, moodle supports offloading the cache system to a fast and robust memory-based storage, like Redis or Memcached.
That's it if you want the minimum moodle to run smoothly in a clustered environment. For us, though, it's more than that. We run an external database (PostgreSQL) authentication for our moodle instance, so we need to replicate the database from our data centre to the cloud to eliminate the dependence on our on-premise infrastructure (at least when a black-out is happening, we still can authenticate users to the moodle instance)
And then, we have a VPL Jail Server (https://vpl.dis.ulpgc.es/index.php) to execute and isolate coding exercises inside moodle.
So, to recap, we have to create the following resource:
- A Database Server
- 2 or more web servers (for scalability)
- An NFS Server (for sharing
moodledatadirectory) - A Redis Server (for caching)
That's it for the bare minimum. For us, we need additional:
- One more database server for authentication
- A VPL Jail server
We will set up auto-scaling based on CPU Usage on the web servers using GCP's Managed Instance Group. This group will have two machines always on and serving HTTP traffic through the load balancer, with additional will be spun up if both of the machine's CPU usage reaches 75%.
Here's the complete topology:
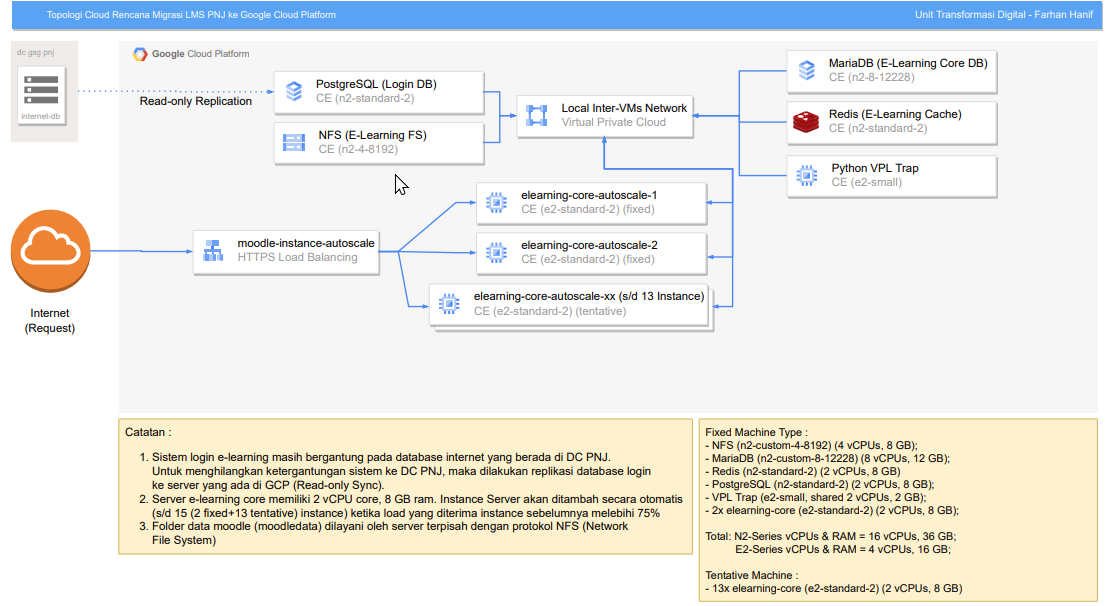
Machine Types and Specifications
VM type and specification are adjusted for our peak ~5000 concurrent users accessing the site, although it's not tested yet for the peak usage, but these estimates are based on our old monolithic server architecture, considering individual component's process usage.
| Purpose | Machine Type |
|---|---|
| MariaDB Server | 1x n2-custom-8-12228 (8 vCPUs, 12 GB Memory) |
| Web Servers (NGINX) | 1x n2-custom-4-8192 (4 vCPUs, 8 GB Memory) |
NFS Server (moodledata sharing) |
2x e2-standard-2 (2 vCPUs, 8 GB Memory) |
| Redis Server (caching) | 1x n2-standard-2 (2 vCPUs, 8 GB Memory) |
| Auth Database Server | 1x n2-standard-2 (2 vCPUs, 8 GB Memory) |
| VPL Jail Server | 1x e2-small (shared vcpus, and memory) |
Getting Your Hands Dirty
Now we have the idea of how we can implement moodle on the cloud, and we get our hands dirty.
For convenience to follow this article, I decided not to write this guide in the order in which I worked on the migration. Following these guides can make the migration process easier, but it may slightly increase costs, as some of the resources created during the second phase will be idling while we do the migration process.
Preparing for the migration
Put your moodle instances in Maintenance mode, or even better, prevent your users from accessing it completely if you can (but you must still have access to it). This will put the data at rest and consistent while we migrate. To put moodle instance in maintenance mode, go to Site Administration > Server > Maintenance Mode and enable the maintenance mode there.
Purge your moodle cache. Purging the cache will significantly cut the size of the file we need to transfer to the cloud VMs, especially if you use moodle's default file-based caching system. You can purge moodle's cache by accessing Site Administration > Development > Purge caches and selecting Purge All Caches
Prepare your database backup.
As we have 80GB+ of the database files, we will use mariabackup to backup the entire database before moving it into our cloud VMs.
First, we must make sure we have installed mariabackup in our old server. To install maria backup on Debian based system type
sudo apt install mariadb-backupor for RHEL system
sudo yum install MariaDB-backupAnd then backup the database using
mariabackup --backup \
     --target-dir=/target/backup/dir \
     --user=myuser --password=mypassword
Mariabackup writes the backup files in the target directory. If the target directory doesn't exist, then it creates it. If the target directory exists and contains files, it raises an error and aborts.
The time the backup takes depends on the size of the databases or tables you're backing up, but it is significantly faster than the standard mysqldump method (you will thank me for this). You can cancel the backup if necessary, as the backup process does not modify the database.
The caveats on mariabackup are, your old MariaDB, and the new MariaDB hosted on the cloud must have the same version, or the restore process will not run later.
For the barebone minimum, you can skip the step below if you're not using an external database as an authentication method.
Setting up PostgreSQL Replication on Master Server
Our authentication database uses PostgreSQL 9.2 and is still needed for other apps in our data centre. So, whole database migration is not possible and requires much more complicated action if we do that. Read-only replication is the way since our moodle instance only reads credentials and user's profile from the external database and does not modify it in any way.
Our on-premise and cloud VMs hosting the database will communicate via a secure VPN connection. With that out of the way, here's how we prepare the master (old) server for replication.
First, edit the PostgreSQL server configuration (usually at /var/lib/pgsql/9.2/data/postgresql.conf) add, uncomment or modify this value:
wal_level = hot_standby
max_wal_senders = 1
wal_keep_segments
And then allow connection from the Cloud IP / subnet in pg_hba.conf (usually in the same directory as above)
host    replication    postgres    10.252.x.x/16    trust
host    login_db       view_user   10.184.x.x/20    trust
Edit the IP address later when you have the VMs external IP Address and change trust to md5 if you authenticate via the internet
And then restart the master server
service postgresql-9.2 restartBackup and compress the database from the master server
sudo su postgres psql -c "SELECT pg_start_backup('replbackup');"
tar cfP /tmp/db_file_backup.tar /var/lib/pgsql/9.2/data
psql -c "SELECT pg_stop_backup();"
Creating the resource on the Google cloud platform
Now the fun part creating cloud resources and securing them.
Creating VPC Networks
VPC networks are responsible for providing network access to our VM instances. We can use the default VPC, but I like to segregate networks between multiple clustered systems, so we are creating a new VPC.
To create a new VPC network, search for VPC network on the top search bar, and click the first product you see, then click create VPC network, give it a name and description, and then on the Subnet creation mode choose automatic, and then click create.
Enabling IAP (Identity aware proxy) to access your server
For security reasons (and minimizing cost), we're not gonna add an external IP address to all the VMs. So we need IAP to proxy our SSH and other sensitive TCP Connection through the google network.
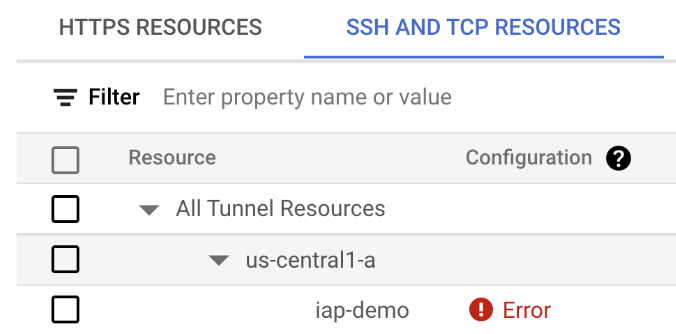
To enable IAP, search 'Identity Aware Proxy' on the top search box and click the first item you found, go through SSH and TCP Resources tab, and then click the checkbox on 'All Tunnel Resources'. And then, on the right info panel, click add principal, type your email (the one logged into GCP), and then click 'IAP-secured Tunnel User' as the Role.
If you see an error like this, don't worry, it's probably a firewall problem, and we will set it up later
Creating the Virtual Machines
It's about time we create the core of our infrastructure
- To create a VM, search for 'Compute Engine' on the search box, and click the first item you find
- Click 'Create Instance'
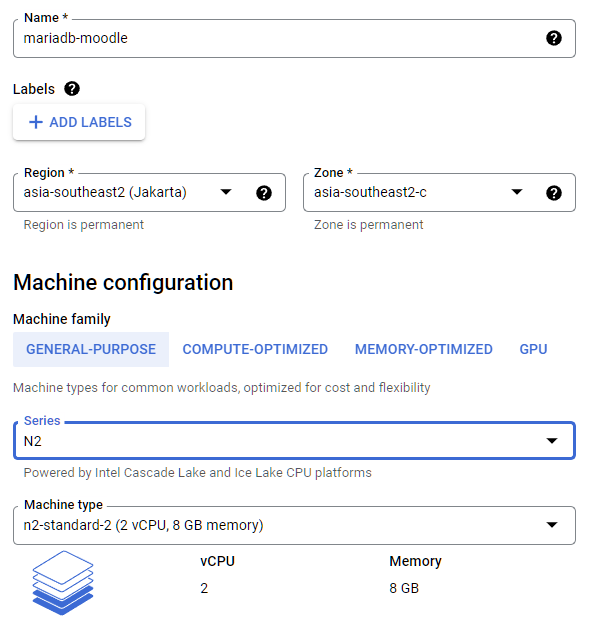
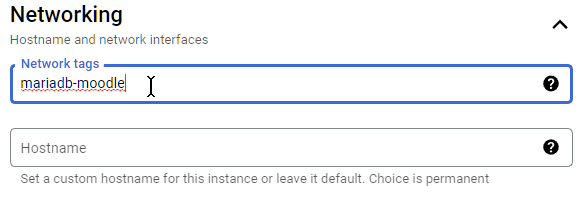
- Give it a meaningful name (e.g. mariadb-moodle for our DB server)
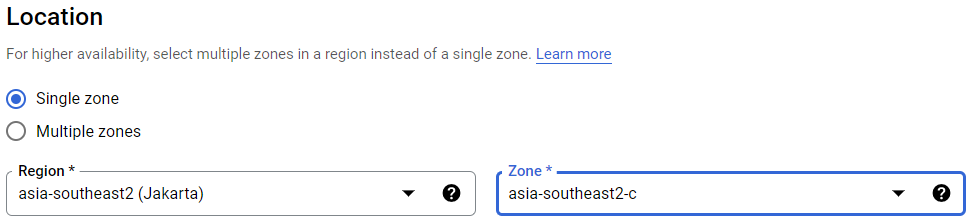
- Choose the region and zone as you like, preferably choosing whichever closer to your users' geolocation (for us, it's gonna be asia-southeast2)
- Chose machine type according to our estimates above
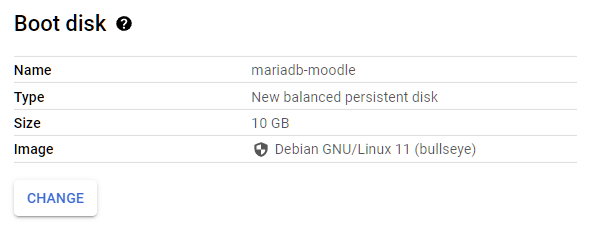
- In the Boot disk, you can change the OS and the disk size there.
- Expand the advanced option

- In the networking option, give it a network-tag, preferably the same as the VM name, so we can remember it later when we apply firewalls
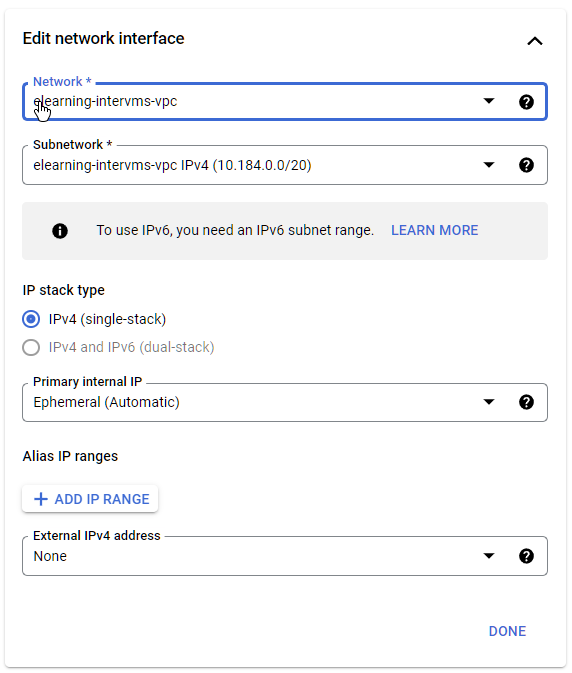
- And then edit the network interface by expanding the card
- For the network, choose the VPC network that we created earlier
- For External IPV4 address, change it to none
Repeat this step for all of our machines explained in the specification section, except the web servers. You only have to create one instance to use later as a template. Your VM list will look like this if you successfully create all the machines required.

Setting up Cloud NAT
If we do not assign an External IP Address to a VM, that VM will not get access to the internet, and we need internet access to our VM for updating OSes, installing packages, etc. Cloud NAT will provide internet access to our private VM that doesn't want to expose itself to the internet.
To create Cloud NAT and pass it into our VM, search for Cloud NAT on the top search box; you know the drill.., and then click 'Create Cloud NAT Gateway', and give it a meaningful gateway name.
For network, choose the VPC network we created earlier, choose the region in which all our VMs are located, and then on the Cloud Router, click 'Create new router'. Give the router a name and description, and then click create.
Once you're done, click create. After the cloud NAT is created, you want to test the connection to the internet in your VM. To test the connection, simply just update and upgrade your packages using apt in any of your VMs.
sudo apt update
sudo apt upgrade
The command will be successful if your connection is established.
farhan_hanif@nfs-elearning-fs:~$ sudo apt update
Hit:1 http://packages.cloud.google.com/apt cloud-sdk-bullseye InRelease
Hit:2 http://security.debian.org/debian-security bullseye-security InRelease

...

Reading package lists... Done
Building dependency tree... Done
Reading state information...
Done 4 packages can be upgraded. Run 'apt list --upgradable' to see them.Setting Up Firewall
To harden our VMs, we need to use a firewall to allow access only from trusted IPs and Subnets to specific ports in our VMs. Firewall rules in GCP control incoming or outgoing traffic to an instance. By default, incoming traffic from outside your network is blocked
GCP assign IPs to VMs based on the region it resides in. For us, our VMs resides in the asia-southeast2 region, so the default subnet is 10.184.0.0/20. We will only allow connections from this subnet (between our VMs) except for one or two rules.
To create firewall rules, go to 'VPC Network' and then click 'Firewall'. After that, click 'Create Firewall Rule', then :
Give it a meaningful name (e.g. moodle-allow-mariadb) and a description
On the network field, choose the VPC network that we created earlier
And then, type the network-tags of the VM we want to apply firewall rule to on the target-tags field;
OR
Change the targets to 'All instances in the network' if we want to apply firewall rule to all of our VMs in the VPC network.
On the Protocol and Ports section, check TCP or UDP and type the port number according to the port you want to open
Finally, click Create
Repeat the process of creating a firewall rule and adjust the value based on the following tables:
| Purpose | VM Target | IP Sources | Ports | Notes |
|---|---|---|---|---|
| Identity Aware Proxy SSH/RDP Access | All Instances in the network | 35.235.240.0/20 | 22/tcp,389/tcp | This will fix the problems in IAP earlier |
| HTTP and HTTPS | Moodle web servers | 0.0.0.0/0 | 80/tcp,443/tcp | Also for VPL Jail Server if you use it |
| Database (MariaDB) | MariaDB Server | 10.184.0.0/20 | 3306/tcp | |
| NFS (moodledata sharing) | NFS Server | 10.184.0.0/20 | 111,2049,33333 tcp and udp | |
| Redis (moodle caching) | Redis Server | 10.184.0.0/20 | 6379/tcp | |
| External Auth DB | PostgreSQL Server | 10.184.0.0/20 | 5432/tcp | Can skip if you dont use ext auth db |
Transferring and Restoring data
It's time to transfer your moodle data from your old, instance to the new cloud VMs. For this section, we will use Google Cloud Storage as intermediary storage between the old and the new moodle instance.
Creating GCS Bucket
Before we start uploading data to google cloud storage, we must create a bucket to store the data. To create a bucket, search for Google Cloud Storage, click create, follow the wizard, note that in the 'Choose where to store your data', change the location type to 'Region', and choose the region in which your VM resides.
Installing Google Cloud CLI utility
Install gcloud CLI utility on your old server. This tool will help us upload the backup directory to Google Cloud Storage
Before we begin, install apt-transport packages.
sudo apt-get install apt-transport-https ca-certificates gnupgImport Google Cloud public key to your server
curl https://packages.cloud.google.com/apt/doc/apt-key.gpg | sudo tee /usr/share/keyrings/cloud.google.gpgUpdate apt and install the gcloud CLI
sudo apt-get update && sudo apt-get install google-cloud-cliRun gcloud init and follow through with the installation wizard
gcloud initFor other Linux distributions, please visit this link to install google cloud cli
Restoring MariaDB
First, take note of the size of your backup directory on the old server.
[root@moodle ~] $ du -sh /var/location/of/your/backup
95G     /var/location/of/your/backup/
After that upload, your database backup files to google cloud storage using this command.
gsutil -m rsync -r /var/location/of/your/backup gs://restore_bucket/mariabackup-m will significantly improve the performance of the upload process while at the same time will thrash down your CPU usage. This sometimes will break your SSH connection. I suggest installing and using screen when executing this command.While we are waiting for the upload to complete, Create and assign a disk to your new mariadb server on the cloud. The size of the disk must be at least the same size as the backup directory on your old server add a few GB of free space for buffers. To add a persistent disk to your VM, follow this link.
After you assign the disk for the restore process, let's format and mount the disk. Use the lsblk command to list the disks attached to your instance and find the disk you want to format and mount.
[farhan_hanif@mariadb-elearning ~]$ sudo lsblk
NAME   MAJ:MIN RM  SIZE RO TYPE MOUNTPOINT
sda      8:0    0   25G  0 disk
├─sda1   8:1    0  200M  0 part /boot/efi
└─sda2   8:2    0 24.8G  0 part /
sdb      8:16   0  300G  0 disk
in the example above, the disk shows up as /dev/sdb. Format the disk using the mkfs tool. This command will delete all data from the specified disk, so make sure that you specify the disk device correctly.
You can use any file format that you need, but I recommend a single ext4 file system without a partition table.
To maximize disk performance, use the recommended formatting options in the -E flag. It is Unnecessary to reserve space for the root volume on this secondary disk, so specify -m 0 to use all of the available disk space.
sudo mkfs.ext4 -m 0 -E lazy_itable_init=0,lazy_journal_init=0,discard /dev/sdbCreate a directory that serves as the mount point for the new disk on the VM. You can use any directory. The following creates a directory under /mnt/
sudo mkdir -p /mnt/restoreAnd then mount it using mount
sudo mount -o discard,defaults /dev/sdb /mnt/restoreGive R/W permission on the disk.
sudo chmod a+w /mnt/restoreAfter the upload is done on the old server, let's download it to the new VM using the same rsync utility from gcloud cli, but this time reverse the directory location.
gsutil -m rsync -r gs://restore_bucket/mariabackup /mnt/restoreAfter the download process is done, let's prepare for the restore. First, ensure the MariaDB process is stopped.
sudo systemctl stop mariadbAnd then, remove your MariaDB data directory
sudo rm -rf /var/lib/mysqlAnd then prepare the backup directory for restoring
mariabackup --prepare \
    --target-dir=/mnt/restore
Next, copy the backup using the mariabackup tools. This command will copy your backup directory inside /mnt/restore to the MariaDB DATADIR (default at /var/lib/mysql)
mariabackup --copy-back \
    --target-dir=/mnt/restore
Then fix the permission of the data dir as it might get changed during the upload/download process.
chown -R mysql:mysql /var/lib/mysql/You must add this line to the MariaDB configuration my.cnf to allow VMs in your network to access the instance via TCP (while we're at it, also enable performance_schema)
sudo nano /etc/my.cnf.d/server.cnf[mysqld]
skip-name-resolve
performance_schema=ONThen, you can start the MariaDB process again, and the data from your old MariaDB server should be restored.
sudo systemctl restart mariadbAfter that, you must create a new user with the subnet of our VMs.
sudo mysql -u root -pmysql> CREATE USER 'root'@'10.184.0.0/255.255.240.0' IDENTIFIED BY 'password';
mysql> GRANT ALL PRIVILEGES ON moodle.* TO 'root'@'10.184.0.0/255.255.240.0';
mysql> FLUSH PRIVILEGES;Now our moodle instance can access the database server by using those users and passwords (again, adjust the subnet according to your VMs region).
Configuring NFS Server
First, take note of the size of your moodledata directory using the same du command
[root@moodle ~]$ du -sh /var/www/moodledata
3.4T     /var/www/moodledata
And then upload your moodle data from your old server to GCS.
gsutil -m rsync -r /var/www/moodledata gs://restore_bucket/moodledataThis upload process will take a very long time (it took me around 12 hours for our 3.4 TB of moodledata). While waiting, let's configure the new NFS server.
Create and assign a disk to the new NFS server as we have done before with the MariaDB server, but this time add more free space to the disk according to your moodle instance usage trends. For us, we're gonna provision 5 TB of standard persistent disk (adding ~1.5 TB free space from our original 3.4 TB moodledata dir size).
Also, change the mount point to /mnt/moodledata.
After we mount the disk, we need to add an entry to /etc/fstab so our new disk will automatically mount between restarts. We need to see the device's location and then add the entry.
[farhan_hanif@nfs-elearning ~]$ sudo lsblk
NAME   MAJ:MIN RM  SIZE RO TYPE MOUNTPOINT
sda      8:0    0   25G  0 disk
├─sda1   8:1    0  200M  0 part /boot/efi
└─sda2   8:2    0 24.8G  0 part /
sdb      8:16   0  5.0T  0 disk /mnt/moodledata

[farhan_hanif@nfs-elearning ~]$ sudo nano /etc/fstab
Above, we see our new disk is located at /dev/sdb, and then add this entry to the end of the /etc/fstab file
/dev/sdb /mnt/moodledata ext4 discard,defaults 0 2After the upload is complete, download the file to our moodledata directory on the cloud server.
gsutil -m rsync -r /mnt/moodledata gs://restore_bucket/moodledataThe upload and download process will take a very long time. Feel free to do another task in this section before continuing to configure the NFS server.
After the download is complete, set the ownership of the moodledata directory, and change the permission
chown -R nobody:www-data /mnt/moodledata
chmod -R 0770 /mnt/moodledata
Then, install and configure nfs-server. Execute the following command to install NFS server
apt install nfs-kernel-server rpcbindConfigure the directory we want to share at /etc/exports
sudo nano /etc/exportsAdd the following line to the exports file.
/mnt/moodledata     10.184.0.0/20(rw,sync,no_root_squash)
# Again, adjust the IP subnet based on your VM region
And then change the RPCPORT to use a fixed port (we already set 33333 at the firewall, so we're gonna use that port)
sudo nano /etc/default/nfs-kernel-serverAnd then change the value
# From this
RPCMOUNTDOPTS=--manage-gids
# To this
RPCMOUNTDOPTS="--port 33333"
And then restart nfs-server and nfs-kernel-server
sudo systemctl restart nfs-server sudo systemctl restart nfs-kernel-serverInstalling Redis Server
This one will be a walk in the park compared to the steps before. Install Redis on our VM by executing this command.
sudo apt install redis-serverAnd then edit the Redis configuration at /etc/redis/redis.conf
sudo nano /etc/redis/redis.confFirst, change the supervised value to use systemd
. . .
# If you run Redis from upstart or systemd, Redis can interact with your
# supervision tree. Options:
#   supervised no      - no supervision interaction
#   supervised upstart - signal upstart by putting Redis into SIGSTOP mode
#   supervised systemd - signal systemd by writing READY=1 to $NOTIFY_SOCKET
#   supervised auto    - detect upstart or systemd method based on
#                        UPSTART_JOB or NOTIFY_SOCKET environment variables
# Note: these supervision methods only signal "process is ready."
#       They do not enable continuous liveness pings back to your supervisor.
supervised systemd
. . .
And then bind Redis to your VM's internal IP Address.
# Adjust this to your VM IP Address
bind 184.0.0.x
Uncomment the requirepass directive and give it a long, complicated password. I recommend using a secure random generator like openssl rand to generate the password for you and store it in a secure place.
requirepass actuallytypeyourstrongpasswordheredontusethisvalueRestart your Redis
sudo systemctl restart redisThat's it. To test your Redis instance, you can use redis-cli. Make sure it asks for a password before typing a command.
farhan_hanif@redis-elearning-cache:~$ redis-cli -h 10.184.0.2
10.184.0.2:6379> ping
(error) NOAUTH Authentication required.
10.184.0.2:6379> auth yoursecurepasswordhere
OK
10.184.0.2:6379> ping
PONG
Setting up replication on PostgreSQL 9.2
You can skip this step if you don't use exactly the same setup for external database authentication.
Because our backup directory for external auth DB is quite light compared to the other two we had to transfer earlier, and we're using a secure VPN, we're gonna directly copy the backup directory from the old server to the new server with scp
scp /tmp/db_file_backup.tar [email protected]:/home/user/backup/After the transfer is complete, make sure the postgresql service on the new server is stopped
sudo systemctl stop postgresql-9.2Make a backup for the PostgreSQL datadir on the new server.
mv /var/lib/pgsql/9.2/data /var/lib/psql/9.2/data.oldExtract the backup file
tar xvfP /home/user/db_file_backup.tarAnd then move it to the datadir
sudo mv /home/user/db_file_backup /var/lib/pgsql/9.2/dataremove the pid file from the datadir
rm -f /var/lib/pgsql/9.2/data/postmaster.pidThen, edit /var/lib/pgsql/9.2/data/postgresql.conf add the following:
hot_standby = onYou need to create recovery.confto start getting the update from the master server, copy the sample config to the datadir, if you can't find the sample config file, just create it.
cp /usr/pgsql-9.2/share/recovery.conf.sample /var/lib/pgsql/9.2/data/recovery.confChange the ownership of the file
chown postgres:postgres /var/lib/psql/9.2/data/recovery.confAnd then add the following to the file
standby_mode = on
primary_conninfo = 'host=10.252.x.x port=5432"
this will work if you set trust on file pg_hba.conf on the master(old) server, if you set it to md5 you need to provide a username and password to the file like so
primary_conninfo = 'host=10.252.x.x user=postgres password=mypass port=5432"And then you can start your PostgreSQL
sudo systemctl start postgresql-9.2To verify that the replication is working, you can add data in the master (old) server and then query it in the new server.
Installing VPL Jail Server
Installing the VPL Jail execution server is simple. First, get the installer from the official site https://vpl.dis.ulpgc.es/ using wget
wget https://vpl.dis.ulpgc.es/releases/vpl-jail-system-[version].tar.gzExtract the archive
tar xvf vpl-jail-system-[version].tar.gzcd into the directory, and then install
cd vpl-jail-system-[version]
sudo bash install-vpl-sh
Follow the instructions and wait for the necessary downloads. The installation script will try to install the development software commonly used.
After the installation finishes, VPL execution will run at port 80 in your server
Configuring Autoscaling and Load Balancer
For this section, we will use GCP's Regional HTTP/S Load Balancer. This product allows us to minimize the cost of VM infrastructure when the usage of our moodle instance is low while able to scale out when the usage is high automatically.
We're gonna set up an instance group with a configured instance template as a backend for the Load Balancer. Our design will always have two VMs, with 15 additional instances that will be spun up if the load is high.
Creating and configuring the web server for VM template
SSH into your webserver template VM, and install NGINX and PHP 7.4. This will install Nginx and php-fpm version 7.4 with the required extension for running moodle. We will also need Redis PHP extension.
sudo apt update
sudo apt install nginx graphviz aspell ghostscript clamav git mlocate
sudo apt install php-fpm php-common php-redis php-mysql php-gmp php-curl php-intl php-mbstring php-soap php-xmlrpc php-gd php-xml php-cli php-zip unzip curl
Edit the php.ini file according to your need
sudo nano /etc/php/7.4/fpm/php.iniFor example :
file_uploads = On
upload_max_filesize = 32M
max_execution_time = 300
memory_limit = 256M
post_max_size = 32M
max_input_time = 300
max_input_vars = 4440
date.timezone = Asia/Jakarta
and then edit the www.conf in the FPMs pool directory
sudo nano /etc/php/7.4/fpm/pool.d/www.confAdd or uncomment this line
security.limit_extensions = .phpThen, copy the default site configuration for Nginx and edit it
sudo cp /etc/nginx/sites-available/default /etc/nginx/sites-available/moodleAnd then change the configuration to be exactly like this
server {
        listen 80 default_server;
        listen [::]:80 default_server;

        root /var/www/html;

        access_log /var/log/nginx/moodle.access_log;

        error_log /var/log/nginx/moodle.error_log info;

        # Add index.php to the list if you are using PHP
        index index.php index.html index.htm index.nginx-debian.html;

        server_name _;

        location / {
                # First attempt to serve request as file, then
                # as directory, then fall back to displaying a 404.
                try_files $uri $uri/ =404;
        }

        location ~ [^/]\.php(/|$) {
                fastcgi_split_path_info  ^(.+\.php)(/.+)$;
                fastcgi_index            index.php;
                fastcgi_pass unix:/var/run/php/php7.4-fpm.sock;
                include fastcgi_params;
                fastcgi_param   PATH_INFO  $fastcgi_path_info;
                fastcgi_param   SCRIPT_FILENAME $document_root$fastcgi_script_name;
        }
}
After that, make a symlink pointing to the file above at the sites-enabled directory
cd /etc/nginx/sites-enabled
sudo ln -s /etc/nginx/sites-available/moodle .
We are done configuring NGINX on the new server. Now, we must mount the moodledata the directory from our NFS server, first install nfs-common package
sudo apt install nfs-commonAnd then make a new folder for the mount point
mkdir -p /mnt/moodledatathen, add an entry to /etc/fstab file
sudo nano /etc/fstabAdd this to the end of the file
10.184.0.X:/mnt/moodledata /mnt/moodledata nfs rw,sync,noatime,rsize=8192,wsize=8192,tcp,timeo=14,hard,intr 0 0Now copy your moodle wwwroot folder from your old server. Run this command on the new server. Change the IP address to your old server's external IP address. (we're using standard scp command here because the size of the directory is relatively small)
mkdir /home/user/html
sudo scp [email protected]:/home/user/backup/ /home/user/html
Then, copy the files inside the directory to /var/www/html
sudo mv /home/user/html/* /var/www/htmlAnd change the ownership and permission
sudo chown -R www-data:www-data /var/www/html
cd /var/www/html
sudo find . -type d -exec chmod 0755 {} \;
sudo find . -type f -exec chmod 0644 {} \;
Make a new dir for moodle localcache
sudo mkdir /var/www/localcachedir
sudo chown -R www-data:www-data /var/www/html
sudo find /var/www/localcachedir -type d -exec chmod 0755 {} \;
After that, change your moodle config.php
<?php  // Moodle configuration file

unset($CFG);
global $CFG;
$CFG = new stdClass();

$CFG->dbtype    = 'mariadb';
$CFG->dblibrary = 'native';
$CFG->dbhost    = 'mariadb-moodle.asia-southeast2-c.c.my-project.internal';
$CFG->dbname    = 'moodle';
$CFG->dbuser    = 'moodleuser';
$CFG->dbpass    = 'moodledbpassword';
$CFG->prefix    = 'mdl_';

$CFG->wwwroot   = 'https://mymoodle.domain.org';
$CFG->sslproxy = true;
$CFG->dataroot  = '/mnt/moodledata';
$CFG->localcachedir = '/var/www/localcachedir';

$CFG->admin     = 'admin';

$CFG->directorypermissions = 0777;

require_once(dirname(__FILE__) . '/lib/setup.php');

// There is no php closing tag in this file,
// it is intentional because it prevents trailing whitespace problems!
Alright, let me explain the important bit of the config file
If you are using ephemeral internal IP Addresses for all of your VM instances (like me), using the internal hostname of your database VM in $CFG->dbhost will help prevent regularly changing your moodle config.php every time DHCP procure a new IP Address for your VM. You can use this hostname for every configuration that requires pointing to your server IP Address (e.g. Redis caching, NFS, external DB auth, or VPL jail)
The default hostname for instances in GCP is formatted like this
<VM_NAME>.<ZONE>.c.<PROJECT_NAME>.internal

# Example
mariadb_elearning.asia-southeast2-c.c.my-project.internal
Since we are offloading SSL to the load balancer, we must add $CFG->sslproxy = true;
Point $CFG->dataroot to our NFS mount point
And then point $CFG->localcachedir to the directory, we have created before
At this point, you can test your moodle instance by giving the web server an external IP address, changing the $CFG->wwwroot to that IP address and disable $CFG->sslproxy
# From
$CFG->wwwroot   = 'https://mymoodle.domain.org';
$CFG->sslproxy  = true
# To
$CFG->wwwroot   = 'http://34.X.X.X';
#$CFG->sslproxy  = true
After testing, change it to your fully qualified domain name and remove the external IP address from the instance.
Creating Image and Instance template
Before we jump to autoscaling and load-balancing stuff, we must create an instance template for the instance group.
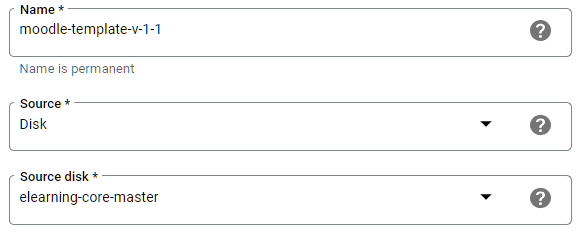
To create a machine image, turn off your webserver VM first, and then go to compute engine page, and then click image at the left sidebar.

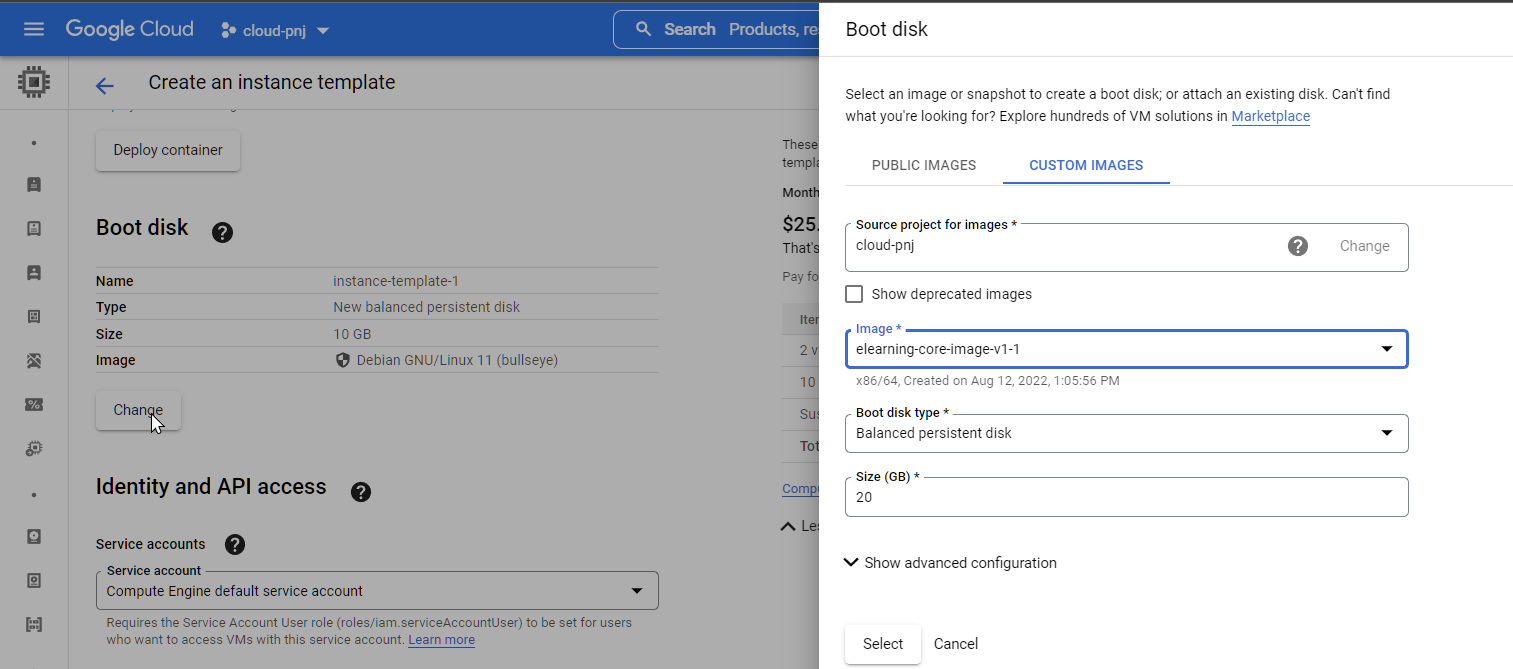
Click create image, give it a name (insert a version if you will, it will be easier to deprecate the image if you make changes to the template later), and then on the source disk, pick the boot disk of your web server VM.
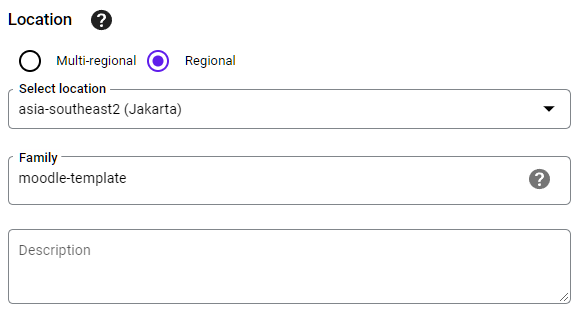
For the location, click regional, pick your VM's region, give it a family name, and then click create.
And then, for instance template, go to instance template and then click create instance template
Creating an instance template is very similar to creating a single instance. I will show you which field to change. Choose or type the same option for other fields as your web server VM.
For the boot disk option, change it to use the custom image you have created.
Configuring Instance Group
Instance group is responsible for autoscaling our web server instance. As a backend for the load balancer, this is where we configure the max load our instance gets before traffics get redirected to another instance.
To create an instance group, go to compute engine and then click 'Instance Group'
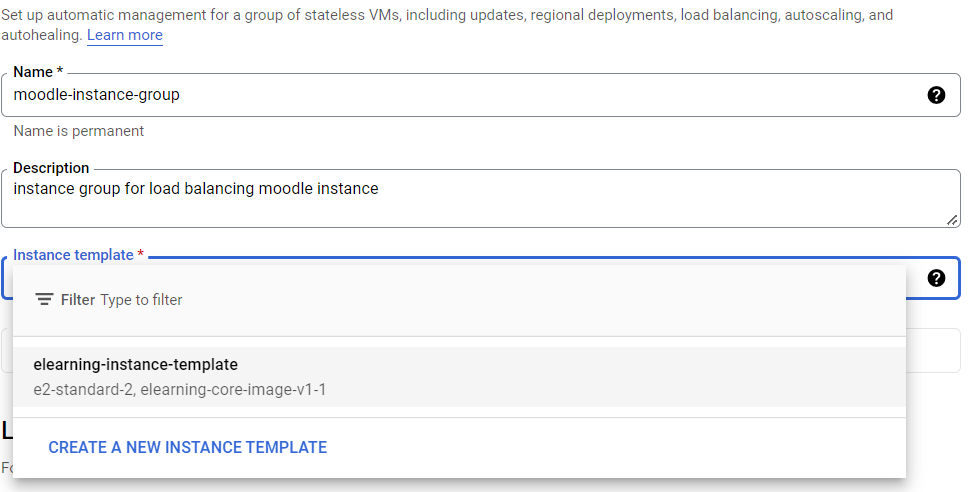
Click on 'Create Instance Group'. On the creation page, you can give it a meaningful name and description. Then choose 'Instance Template' from the one we have created before.
For 'Location', you can choose single zone or multiple zones. Multiple zones improves availability where if there's maintenance on a zone, your instance on the other zone will not be affected. If you choose multiple zones, set the minimum number of active instances to the amount of the zone in your region. For us, we're just gonna pick a single zone. We don't need 100% uptime for our moodle instance.
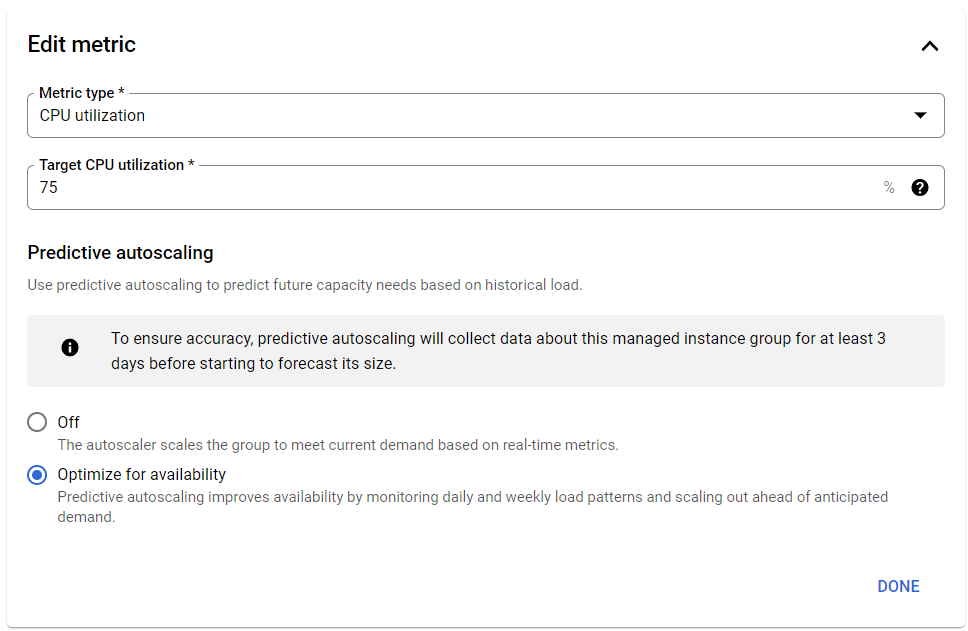
On autoscaling, type 2 for the minimum number of instances and 15 for the maximum number of instances. You can adjust this value based on your concurrent users and your budget.
On the metrics for autoscaling, we can type 75% on the Target CPU Utilization. This will allow us to utilize more CPU usage before the auto scaler decides to spin up a new instance. Also, enable predictive autoscaling so that we won't have downtime when the load balancer tries allocating traffic between instances when there is a massive burst of users using our moodle instance in a predicted timeframe.
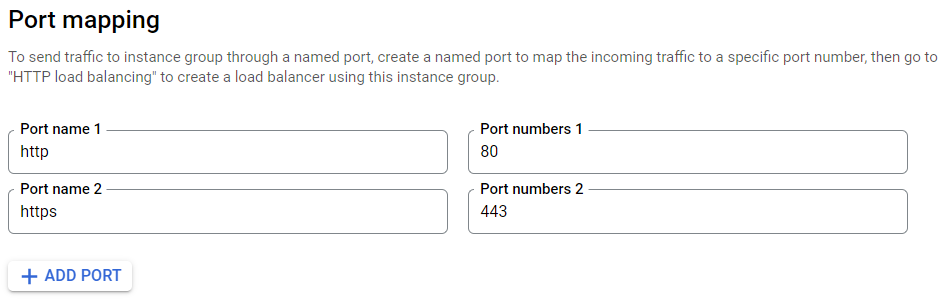
And then, add a 'Named Port' in Port mapping for PORT 80 and PORT 443 (HTTP/S Port).
Click Create, and your instance group will be created with the minimum number of instances you typed.
Setting up Regional HTTP(S) Load Balancer
For the last step in this migration process, we're bringing our moodle instance to the internet via Google's regional http(s) load balancer.
The Regional HTTPS LB is responsible for redirecting http/s traffic from the internet into our instance group's back end. It is also responsible for HTTPS SSL Offloading, so our traffic from the LB to our backend instance will be transmitted through standard HTTP protocol (all traffic is still encrypted when passing through google's network)
To set up Regional Load Balancer, go to Load Balancer, and then click on 'Start Configuration' on the HTTP(S) Load Balancing card.
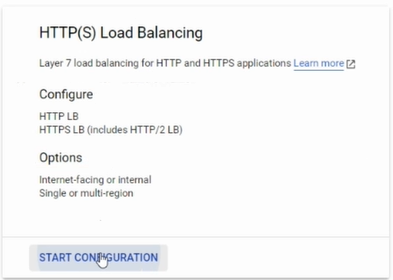
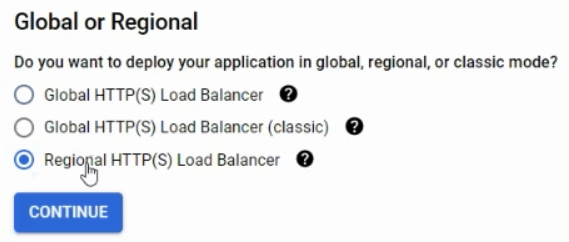
Choose 'Regional Load Balancer', and then click continue.
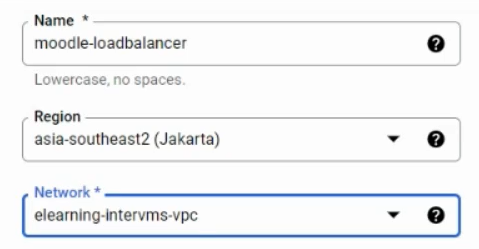
And then, give it a name, choose the same region as your VM, and choose the same VPC network as your VM.
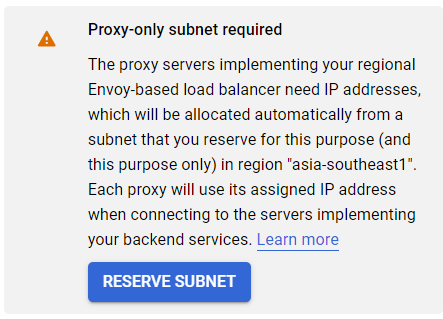
If this error appears when you select the network, click 'Reserve Subnet'
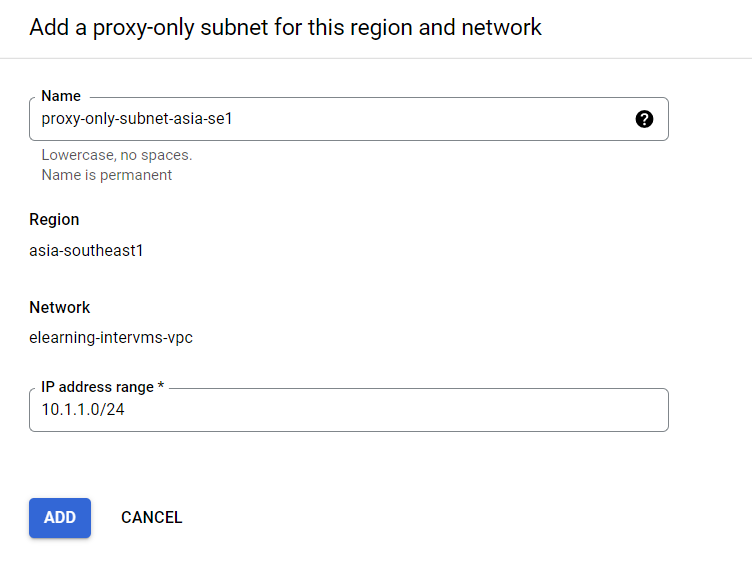
And then, give the subnet a name, and assign whatever /24 network you want to the IP Address range. After that, the error will be gone.
Next, on the right end, 'Frontend Configuration' give the frontend a name, and then on 'Protocol', choose HTTPS. The Port number will change automatically to PORT 443
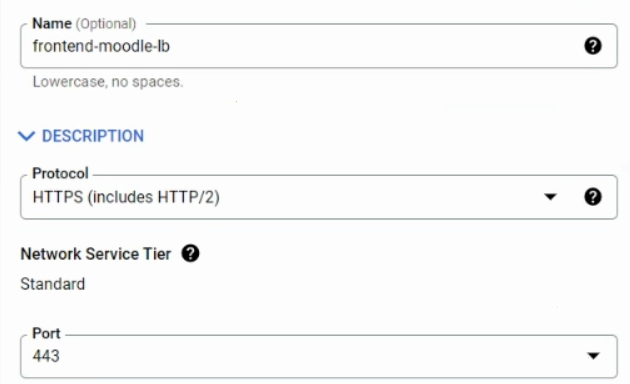
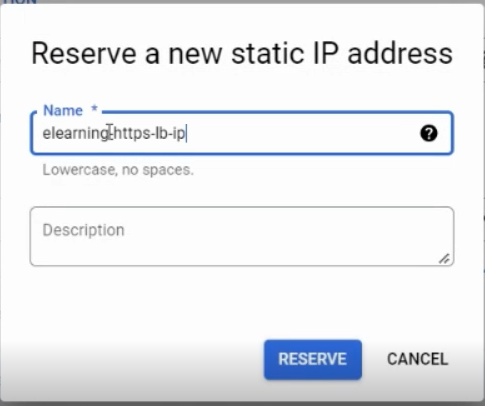
And then, on IP Address, click Create new IP address. This action will reserve an external IP address for you to use on the LB. Remember to give it a meaningful name and description, so you can find it later if you want to change or dismiss it.
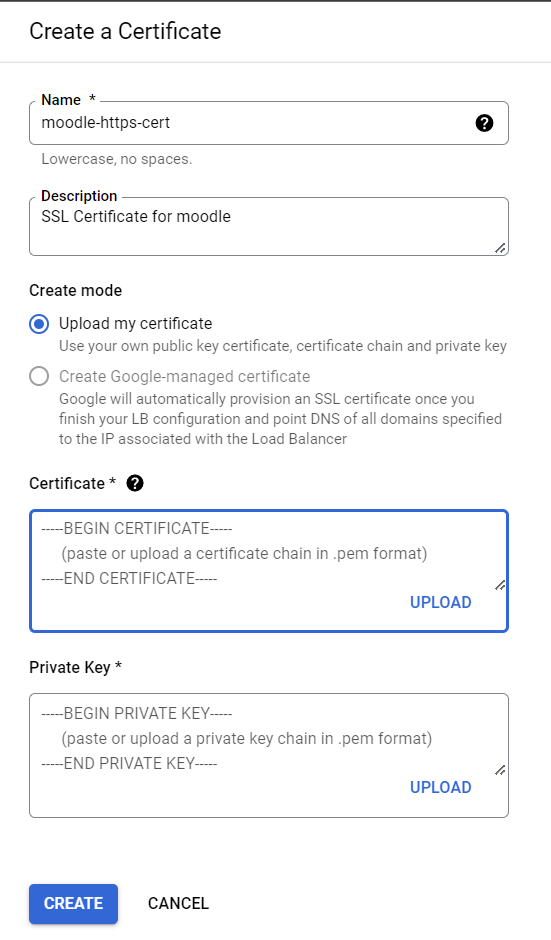
And then, you must upload an SSL certificate for the LB to encrypt your traffics. Click create new certificate to begin uploading your SSL certificate to LB. You can upload or copy/paste your SSL certificate and private key on the field there.
After completing the frontend configuration, you can switch to the Backend Configuration by clicking it from the left-hand menu.
On the backend configuration on the right hand, click 'Create a backend service', give it a name and description, and then, since we are offloading the SSL encryption on the frontend, we can choose HTTP on the protocol
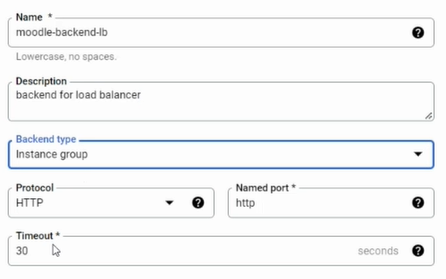
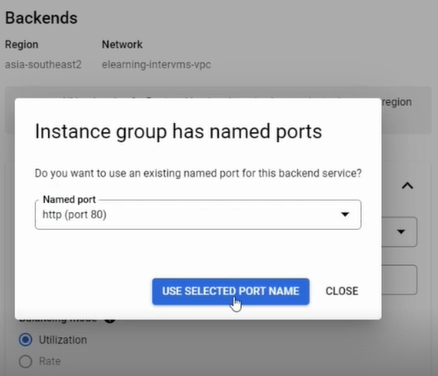
And then, on the new backend section, choose the instance group we have created before, and a prompt will appear to use the named port we have configured. Click 'Use selected port name' on the prompt, and the port will automatically fill in.
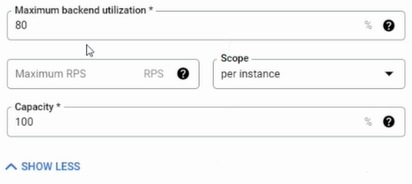
Next, on the maximum backend utilization, fill in 90%, and then set the capacity to 100%
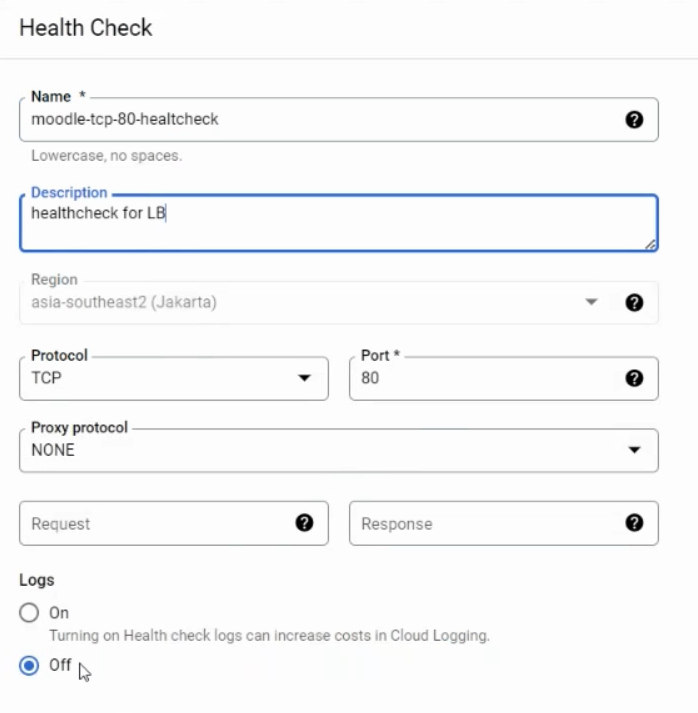
And then, create a new health check for the load balancer on the TCP port 80 of the instance group. The load balancer will use these checks to determine whether our backend VM used is healthy to serve a user.
Then, we can ignore the routing rules and directly create the load balancer. By now, you must point the IP address given by the load balancer to your domain's DNS record.
After you point it, you can now access your moodle instance by visiting https://moodle.yourdomain.org/, but if your user type moodle.yourdomain.org or http://moodle.yourdomain.org/ a request time-out will appear because nothing is serving on the default HTTP port on our load-balancing service. For that, we have to redirect the standard http traffic to the more secure https in the next section.
Redirecting HTTP traffic to HTTPS
Regional HTTP(S) load balancer does not support configuring redirects to HTTPS in the Google Cloud Console. To do that, we must use traditional Google Cloud CLI. You can use Cloud Shell to get Cloud CLI working easily.
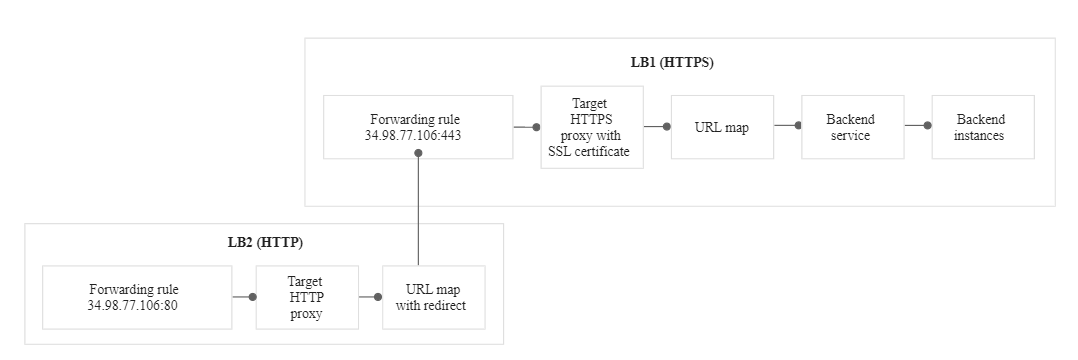
Essentially we will create a new HTTP-only load balancing, but instead of a backend, the load balancer will only redirect the traffic to a new scheme. Here's a diagram taken from the google cloud documentation. LB1 is our existing Regional HTTPS Load Balancer.
Go to Cloud Shell by clicking the console icon on the top right of Google Cloud Console UI.

After you log into the cloud shell, Create a YAML file /tmp/web-map-http.yaml. This example uses MOVED_PERMANENTLY_DEFAULT as the response code. Change example.com to your FQDN
nano /tmp/web-map-http.yaml kind: compute#urlMap
name: web-map-http
defaultUrlRedirect:
redirectResponseCode: MOVED_PERMANENTLY_DEFAULT
httpsRedirect: True
tests:
- description: Test with no query parameters
host: example.com
path: /test/
expectedOutputUrl: https://example.com/test/
expectedRedirectResponseCode: 301Create the HTTP load balancer's URL map by importing the YAML file. The name for this URL map is web-map-http. Change the region according to your regional LB region.
gcloud compute url-maps import web-map-http \
    --source /tmp/web-map-http.yaml \
    --region=asia-southeast2
Create a new target HTTP proxy or update an existing target HTTP proxy using web-map-http as the URL map.
gcloud compute target-http-proxies create http-lb-proxy \
    --url-map=web-map-http \
    --region=asia-southeast2
OR if you've done something wrong and want to update it
gcloud compute target-http-proxies update http-lb-proxy \
    --url-map=web-map-http \
    --region=asia-southeast2
Create a forwarding rule to route incoming requests to the proxy. The --address flag specifies an IP address, the same IP address used for the external HTTPS load balancer.
--address: change to your external IP address assigned to the HTTPS LB
--network: change it to your VPC network name
--region: change it to your LB Region
gcloud compute forwarding-rules create http-content-rule \
    --load-balancing-scheme=EXTERNAL_MANAGED \
    --address=37.X.X.X \
    --network-tier=STANDARD \
    --network=my-vpc-network
    --region=asia-southeast2 \
    --target-http-proxy=http-lb-proxy \
    --target-http-proxy-region=asia-southeast2 \
    --ports=80
That's it. Now you can test the redirection by visiting moodle.yourdomain.org It should automatically redirect you to the HTTPS version of your moodle instance.
Important settings in moodle
You might remember that we set up a Redis caching server but haven't used it yet. Well, we must set it up first from the moodle site administration.
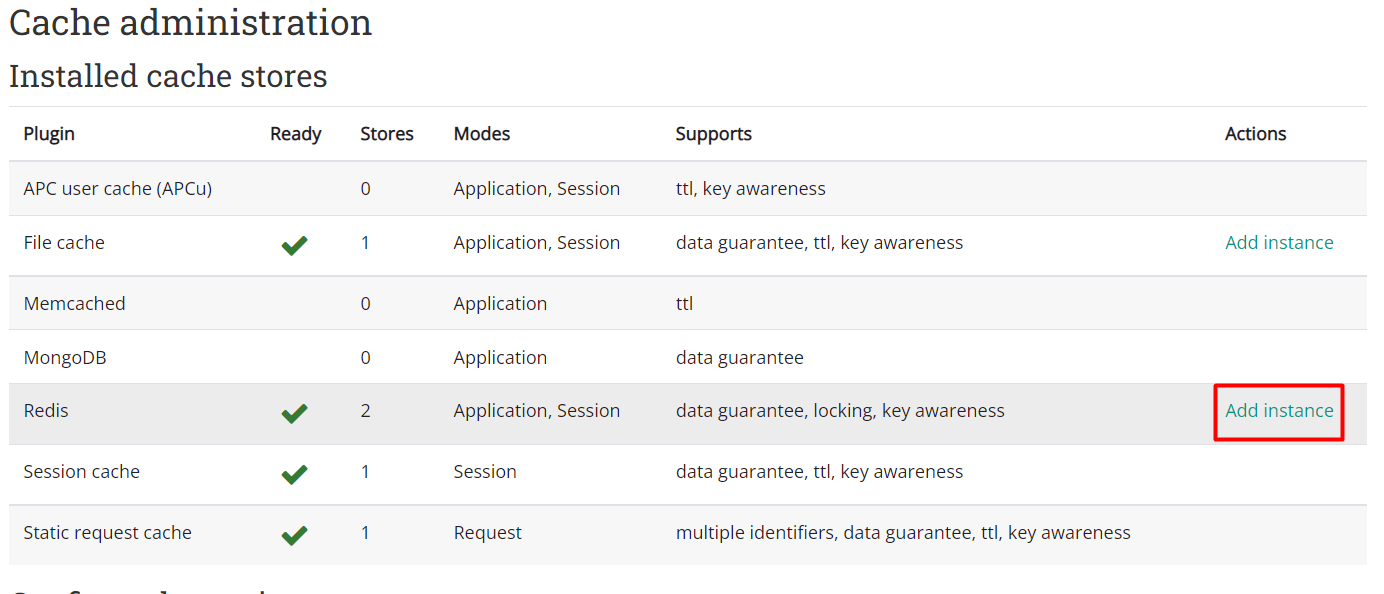
To configure Redis, go to Site Administration > Plugins > Caching > Configuration. There you can click Add Instance on the Redis row.
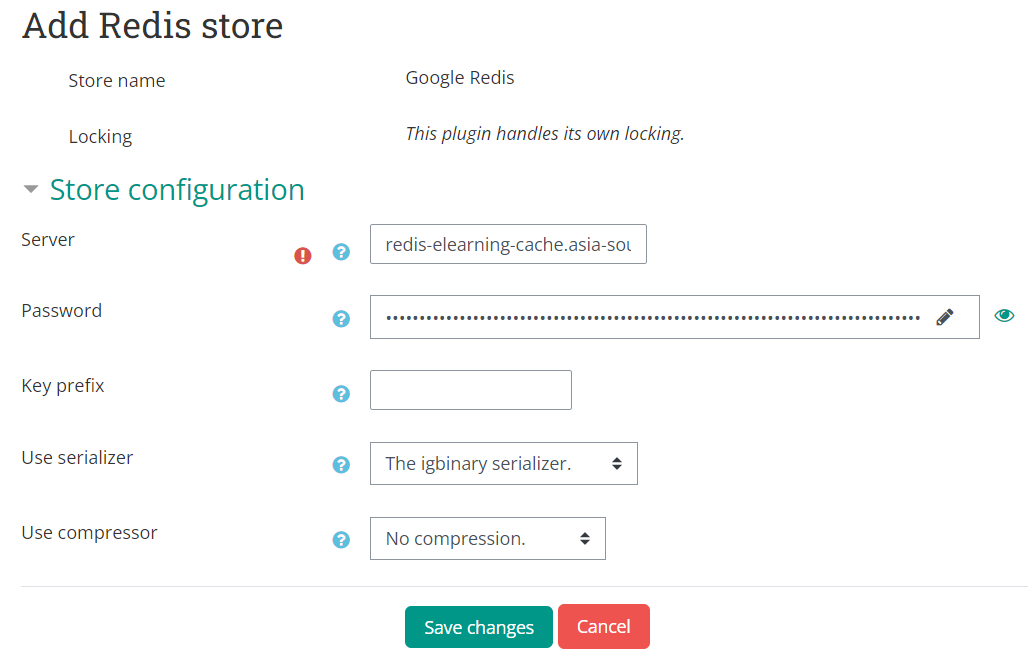
Give it a name, then type your Redis server IP / hostname (i recommend hostname), and then type the long and secure Redis password we have set up. After that, on the Use Serializer, select igbinary serializer. This option will massively increase your PHP serialization performance to the Redis server. Click add store or save changes after that.
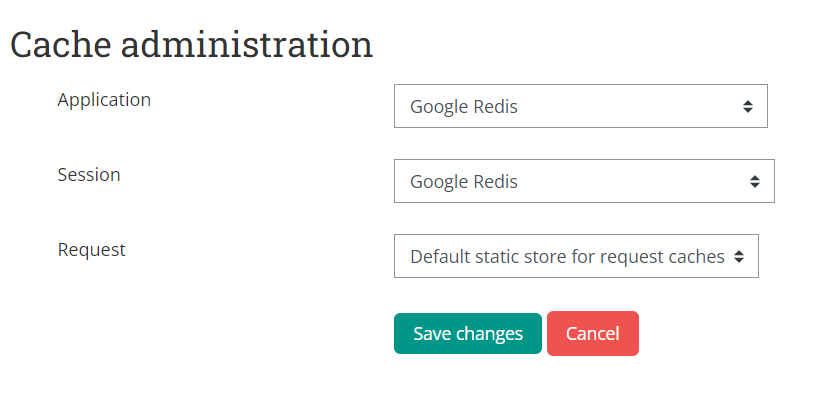
After you set up the Redis store, scroll down to the bottom of the page and click Edit Mappings to set the default cache mapping for moodle.
Configure the Application Cache and Session Cache to use your credit store, and save changes.
You can skip this step if you don't use external DB for authentication and VPL. If you use it, follow through.
Change the DB hostname for the External Database authentication in Site Administration > Plugin > Authentication > External Database

Also, change the DB user and password if you change them during the server configuration process.
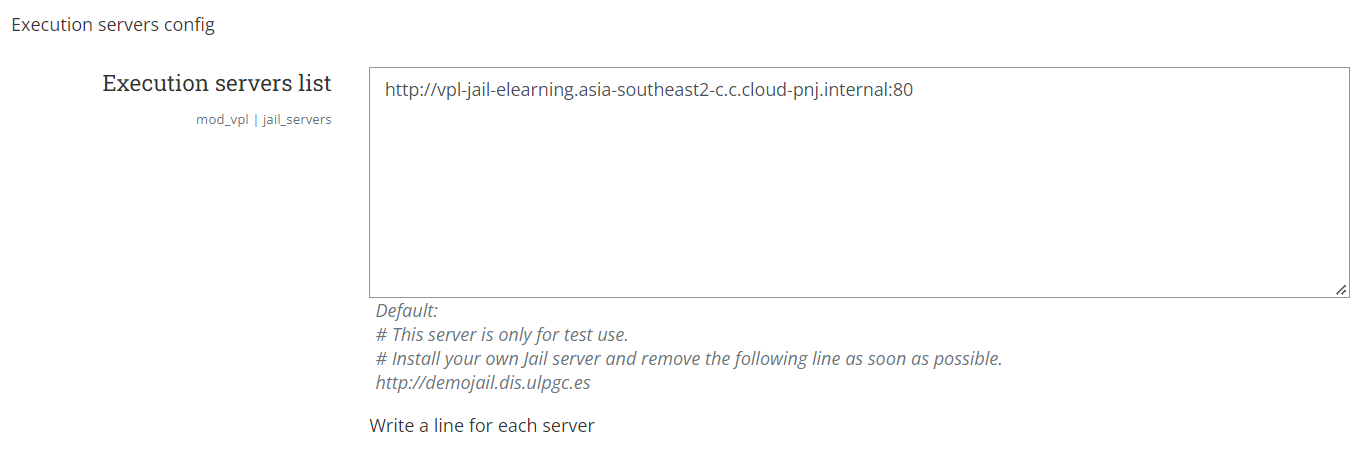
To configure the VPL execution server, go to Site Administration > Plugins > Activity Modules > Virtual Programming Lab and then add your VPL execution server IP Address/hostname in the Execution Servers List
Closing
Whew, that was a long write. It's a bit more complicated than spinning up a new moodle instance, but that was fun. For the record, We've planned and reserved 14 days of downtime when doing this migration, but in real-time, our moodle LMS is up in only 3 days (that was including around 24 hours of transferring files from our old server to GCS via the internet), damn that was fast!
If you want to ask questions or need help migrating your moodle instance to the cloud, you can email me at [email protected].
Thank you for reading this article!